














There are a few reasons you may need to learn how to submit your photos for science journals:
- First, sharing your work with the scientific community is a way;
- Second, it’s a way to get feedback from other scientists;
- Third, it’s a way to make sure that your work is published in a reputable journal;
- Finally, you may get paid for your high-quality photo;
Do you have a great photo that you think would make a great addition to a science journal? If so, submitting it for publication can be a great way to see your work by other scientists and increase your exposure in the field.
In this blog post, our photographers will walk you through submitting a photo for publication in a science journal. We will cover everything from choosing the right journal to submitting your work online. Let’s get started!
Why Submit Photos for Science Journals?
There are many reasons to submit photos to science journals:
- Perhaps you have taken an interesting photo of a natural phenomenon that you think would be of interest to others in the scientific community;
- Maybe you have captured an image of something rare or unusual that could contribute to research;
- Or, you might simply want to share your passion for photography with like-minded individuals;
Whatever your motivation, submitting photos to science journals can be a great way to get your work seen by a wide audience. Not only will you have the satisfaction of knowing that your images are being used to further scientific knowledge, but you may also find yourself gaining recognition and respect from your peers.
Whatever your motivation, submitting photos to science journals can be a great way to get your work noticed and potentially make a difference in the world of science.
General Guidelines for Submitting Photos to Science Journals
Suitable Format
The file format of the image should be either JPEG, TIFF, or EPS.
The resolution of the image should be 300 dpi for photos that are to be printed in journals.
For digital images, the minimum acceptable width is 1000 pixels (about 11 inches wide at 72 pixels per inch). Images submitted in electronic formats must have a corresponding print photograph available upon request.
JPEGs are generally acceptable for Web use only if they are saved at a low compression setting, which will result in large file size but preserve detail and clarity.
When submitting a photo electronically, please do not “downsize” your hi-resolution photo to a web-friendly JPEG by using your photo editing software. This will result in a poor-quality image.
TIFFs (or EPSs) should be submitted for photos that are to be printed in journals, as these file formats preserve detail and clarity better than JPEGs.
If you have any questions about the format or resolution of your images, please contact the journal staff before submitting your photos.
The Official Source
If you want to submit a photograph to be published in a science journal, there are a few ways to go about it. The most official way is to visit the website of the journal you’re interested in and look for their submission guidelines. Many journals will have specific instructions for submitting photographs, so you must follow these to the letter.
In some cases, you may need to submit your photograph through an online portal. Others may require that you email your photograph directly to the editor. If you’re not sure how to proceed, it’s always best to contact the journal directly and ask for guidance.
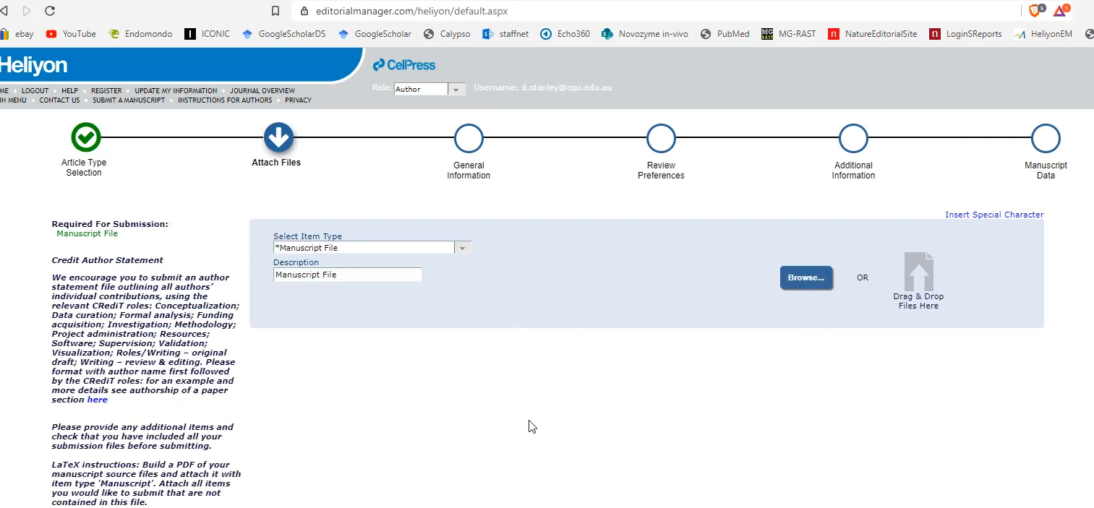
For example, the official source for submitting a photo for the Science Journal is the website. The first step is to make an account on the site. Once you have made an account, you can start to fill out the submission form. On the form, you will be asked to provide your contact information, as well as the title of your submission. You will also be asked to provide a brief description of your submission. In addition, you will need to upload your photo onto the website.
After you have completed all of these steps, simply click on the submit button and your application will be sent off! If everything goes smoothly, you should receive an email notification within a few weeks letting you know that your photo has been accepted into the journal! Congratulations – now you can tell all your friends that you’re a published science photographer!
References for Editors
Include the names and institutional affiliations of three potential reviewers for your manuscript, as well as your own. Your references should be familiar with your work and able to provide an objective evaluation.
Author Contributions
Include the following section if applicable:
- Conceived and designed the experiments/analyzed the data;
- Performed the experiments/collected the data;
- Contributed reagents, materials, and analysis tools;
- Wrote the paper;
The corresponding author must have given final approval for the version to be published. We will not consider submissions without this section.
How Can You Send Your Photos
Use Official Social Media Pages
Nowadays, most journals have an official Facebook or Twitter page that they use to communicate with the public. Many of them also accept submissions through these platforms.
To submit your photo to a journal through social media, simply find the appropriate page and look for instructions on how to submit (usually found in the About or Submission Guidelines section).
If you can’t find any specific instructions, simply send your photo along with a short description to the journal’s social media account.
Use Official Email
Another option for submitting photos to magazines is to use an online submission form or email address. This is usually listed on the journal’s website under the “Submissions” or “Contact Us” sections. Once you’ve located the correct email address or submission form, simply attach your photo and include a brief description of the image. Be sure to also include your contact information so that the journal can get in touch with you if they’re interested in using your photo.
Use Mail Address to Send a Physical Copy
If you want to submit a physical copy of your photo, you’ll need to use the mail address listed in the journal’s submission guidelines. Make sure to include a self-addressed stamped envelope (SASE) so the editors can return your photo if it isn’t accepted. You should also include a brief note with your contact information and a description of the photo.
It’s important to follow the specific submission guidelines for each journal, as they may vary slightly. For example, some journals may require that photos be submitted electronically, while others will only accept physical copies.
What Kind of Images Should You Avoid?
There are a few types of images that you should avoid submitting to science journals. These include:
- Images that are too small or have a low resolution;
- Images that are blurry or out of focus;
- Images that are heavily edited or manipulated;
- Images that contain sensitive information;
- Images that are copyrighted or have other restrictions;
If you’re not sure whether an image is appropriate for submission, it’s always best to err on the side of caution and avoid submitting it.
FAQ
How do you take photos for a research paper?
There’s no one answer to this question since the type of photo you’ll need will vary depending on your paper’s topic.
However, here are a few general tips to keep in mind:
- Make sure your photos are clear and well-lit;
- If you’re photographing something small, use a macro lens or get close to your subject;
- Use a tripod if possible to avoid blurry shots;
- Pay attention to composition and framing;
Which image format is best for a research paper?
There is no one answer to this question as it depends on the journal you are submitting to and their requirements. However, some general tips include using TIFF or EPS format for images that will be printed in a journal and JPEG for images that will be viewed online.
For more specific advice, it is best to consult the guidelines of the journal you are submitting to.
How do I put a picture on paper?
The process of putting a picture on paper is called printing. There are many ways to print pictures, but the most common way is to use a printer. Printers come in many different shapes and sizes, but they all have one thing in common: they use ink to transfer images onto paper.
To print a picture, you first need to find a printer that supports printing pictures. Most printers these days do support printing pictures, but some older models may not. Once you’ve found a compatible printer, you’ll need to get your hands on some photo paper. Photo paper is specially coated to help the ink from your printer adhere better, resulting in sharper and more vibrant prints.
Once you have your photo paper, it’s time to load it into your printer. Make sure you follow the instructions for your particular printer model, as the process can vary depending on the make and model. Once your photo paper is loaded, you can now print your pictures!
Simply select the “print” option in your software program and choose your desired settings (such as print quality and quantity). Then, sit back and watch as your pictures come to life on photo paper!
How do you make a figure for a scientific paper?
You have a great image of your data, and you want to include it in your upcoming publication. Whether it’s a photograph, graph, or another type of figure, there are some general guidelines to follow to ensure that your image is high quality and ready for print.
Here are some tips on how to make a figure for a scientific paper:
- Choose an appropriate file format. TIFF or EPS files are best for line art, while JPEG or PNG files are better for photos;
- Make sure the resolution is high enough. 300 dpi is generally the minimum required resolution, but 600 dpi is even better;
- Check the contrast and brightness of your image. Adjust as needed so that the figure is clear and easy to see;
- Save your file and submit it according to the journal’s guidelines. Many journals have specific requirements for figure submissions, so be sure to follow them closely;
How do you add a picture to a PDF for free?
There are a few ways that you can add a picture to a PDF for free:
- One way is to use an online PDF converter. This will allow you to convert the PDF into an image file, which you can then insert into the document;
- Another way is to use a free online PDF editor. This will allow you to add the image directly to the PDF;
- Finally, you can use Adobe Acrobat Reader to insert the image. This is a paid program, but it offers a free trial period. Once you have inserted the image, you will need to save the document as a PDF again. You can then print it out or email it to your intended recipient;
How do I create a high-resolution image for publication?
The first step is to determine the purpose of your image. Will it be used for a print publication? If so, you’ll need to create a high-resolution image that is at least 300 dpi (dots per inch). For online use, a resolution of 72 dpi is typically sufficient.
Next, consider the format of your image. The most common formats are TIFF and JPEG, but there are many others (e.g., GIF, BMP, PNG). Each format has its advantages and disadvantages, so it’s important to choose the one that best suits your needs.
How do I convert a JPEG to high-quality photos?
There are a few things you need to do to convert your JPEGs into high-quality photos:
- First, open up the image in an editing program like Photoshop;
- Next, go to the “Image” menu and select “Mode”;
- Finally, change the mode from RGB to CMYK. This will ensure that your photo prints out with accurate colors;
If you don’t have access to Photoshop, several free online programs can also perform this conversion. Just search for “JPEG to CMYK converter” online and you’ll find several options. Once you’ve converted your image, save it as a TIFF file for the best quality printing results.
